DIY pom pom wreath step by step. If you always wanted to create your very own pom pom wreath this tutorial is fairly easy to execute. You will learn to make pom poms with different techniques and attach them to the wreath.

I have recently fallen in love with Pom Poms and with this wreath that you are about to make. The pompoms that you will learn to make will come up fluffy and in perfect shape if you follow the tutorial accordingly.
DIY pom pom wreath step by step
Once the pom pom wreath is ready you can place it in any room and will instantly brighten up the decor. This pom pom wreath is best to keep indoors or out of sunlight and wet conditions to avoid deterioration.
Let’s start to make this fluffy pompom wreath
Keep in mind that this tutorial is quite long because we will make the pom pom wreath from scratch, but you will also learn how to make pom poms in two simple ways.
What you need to make a pom pom wreath from scratch:
Lots of yarn in your favourite colour combination /Hot glue gun/ Glue/ Scissors / Burlap Ribbon or Jute Ribbon / Cardboard/ News Paper/Papers/ White paper tape
If you already know how to use a plastic PomPom Maker, you can do so, but for newbies, I will teach you two methods, one by using cardboard discs and the other by using your hand.
Step one to make a pom pom wreath from scratch
Feel free to use a Styrofoam wreath, but I prefer to save money and use cardboard and recycled newspapers. Watch and learn because you might even sell these pompom wreaths on Etsy and make extra money. Also, if you need other ideas to make and sell for profit, check this post for how to upcycle old wine bottles into home decor accessories and art.


You can give a round shape of cardboard according to the size that you want your wreath. Prepare lots of papers or newspapers. Just as shown in the above image, roll the paper and wrap the cardboard while glueing small patches.

Wrap the paper all around until all the cardboard is covered properly.

Once the cardboard is wrapped with paper it will look chunky. After we wrap the wreath with masking tape, fabric or burlap to make the surface even and easy to attach the pom poms.
Step 2

You might like:
DIY Easter bunny treats bag step by step
DIY Easter crafts for kids and adults that’s a joy to make
How to make paper flower bouquet step by step tutorial
DIY paper palm leaves step by step
DIY Paper bicycle step by step with pictures

At your choice, you can use colourful masking tape or leave it white just as we did in this tutorial.

Attach a twine/string so you can hang the wreath easily. Make sure this string is enough sturdy to hold the wreath (once we attach the pompoms, it will become a bit heavier).
If decorating your home with self-made items is something you love and planning to save money on, then you might enjoy downloading and printing trendy designs and placing them on beautiful frames.
To add a little personality and humour to your bathroom, download Bathroom SVG online for the price of a coffee.

Step 3 we prepare the pom poms for our wreath:

You can use any type of yarn for this wreath. Lots of yarn in your favourite colour combination.

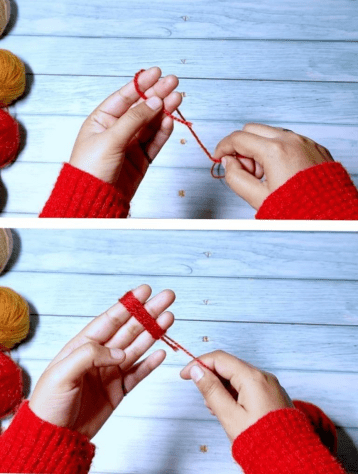
This is how you can make a pom pom just by using yarn, scissors, and your hand. Making Pom poms with the hand is pretty easy and fun.

Using 2-3 fingers will give you a good enough normal size pom pom. So before you get started first decide how big you want your pom pom. You can wrap 2, 3, or 4 fingers. You could also wrap your whole hand if you want a big size pompom.
Making handmade pompoms is a low-cost project and can be used to create many other crafts
DIY pompom wreath step by step
Carefully remove the yarn that is wrapped on your finger and take another piece of yarn to wrap it around and finally tie a tight knot. Tighten the knot 2-3 times, to make sure it won’t open.
Just like this pretty pompom wreath, you can make some cute crafts and sell them online or at craft fairs. Kids crafts are very popular and with a fingertip, you can download already-made designs and print them for personal or commercial use.
Take a look at these adorable Tooth SVG; they are simply irresistible. If you are planning to use them for print on demand, contact the seller and ask for details about the licence.


After tying the yarn, hold it with two fingers placed right in the middle of the yarn and cut it around until it takes a beautiful rounded shape.

The more you trim it in a circular shape, the better pom pom will be prepared.
Now let’s share how to make pom poms with cardboard discs

To make a pom pom you do not necessarily need to have a plastic pompom maker. All you need is 2 pieces of cardboard in the shape of two discs ( use a cup or a glass to draw the shape on the cardboard and then cut just as shown in the picture).
Once you have the cardboard discs, wrap yarn on the discs according to how dense you want the pom pom to be. (You can watch here the video tutorial again to learn this pom pom technique).

Cut the yarn with scissors between the two discs and be careful so that no short yarn comes out.

Take a long piece of yarn and wrap it in the middle of the cardboard disc and tie a knot as tight as possible. Tie 2-3 times the yarn to make sure is fully secured and won’t open.

Take 2 pieces of circular cardboard and hold them on the top and bottom of the pompom so you can cut evenly a perfectly rounded shape.

Shape round from each side so that lovely soft fluffy and squishy Yarn Pom Poms get ready.

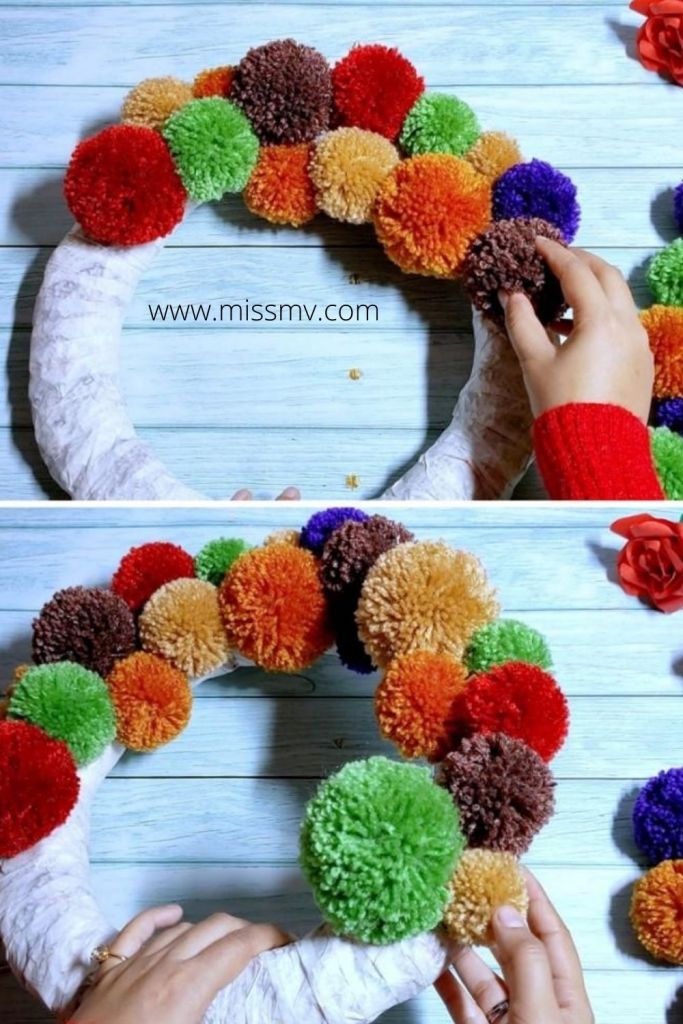
We will need lots of pom poms in different sizes to cover the whole wreath. Depending on what style you want to make your wreath, you can make the all pom poms in the same size, or add a few larger ones just as we did with this craft.
Step 4:

Now start attaching the pom poms to the wreath by using the glue gun.


Now we make ready the burlap ribbon

Please watch the YouTube video to learn how to make this burlap ribbon

This will give a great look to the wreath.

Burlap ribbon can be applied anywhere on the wreath. I added it on the bottom and it looks fabulous. This will give a very unique and rustic look to the wreath.

Now, if you see some spots that are not properly covered on the wreath, you can add pom poms here and there to make it full. I hope you enjoy making this beautiful colourful Pom Pom Wreath and I would love to know your opinions and suggestions.
Thank you so much and please pin any image to access the tutorial easier.
Please note: If you want to use a pin for a roundup in your article, you must add a do-follow link to this article. A single image is allowed to use for your round-up blog post. Do not copy parts of the tutorial and post it on your blog claiming that is your content.


Disclaimer: This article contains sponsored links by DesignBundles.


