DIY cardboard star tray step by step. How to make a food star tray at home. Easy ways to recycle cardboard. How to make a cardboard star try step by step. Handmade cardboard jewellery star tray.

Do you have some cardboard laying around the house? I’m pretty sure everyone has some cardboard in the house from shoe boxes, or any parcel you might have received, so why not put it to good use and turn it into a piece of art?
Apart from shoe boxes, I have a big cardboard roll that I use for shipping parcels every time I sell something online.
The idea to make a cardboard star tray come up when I actually wanted to buy a wood star tray. Because I couldn’t find one anywhere, I decided to make it myself and experiment with cardboard rather than wood.
The picture below is where I got the inspiration to make this cardboard star tray. My end product is far from what this beautiful wood star looks like, but I’m very pleased with this experiment. The owner of the image is @thefictionfaery on Instagram. You can follow this page to get some more inspiration from this talented lady.

I hope you will enjoy making this DIY project because is quite a good accessory to keep the jewelry in order or just to use for Insta worthy images.
Before you start the project help yourself with the (video tutorial) and pause it every time you complete a step.
Let’s start the tutorial.
Supplies Needed:
- Cardboard
- Scale
- Scissor
- Cutter
- Pen or pencil
- Dark Brown acrylic paint
- Paintbrush
- Hot glue

Step One for making the star tray
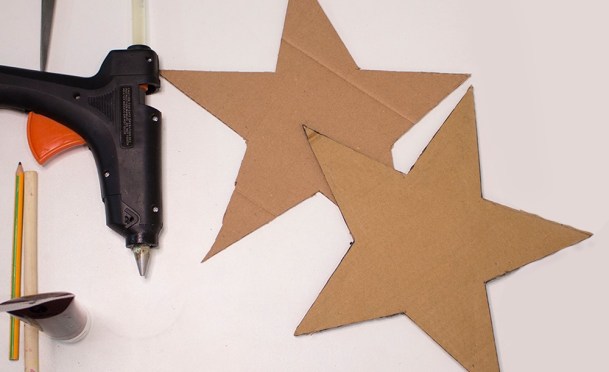
Cut two pieces of cardboard in 10.5 X 10.5-inch squares, then trace a star shape. The star should be big enough and must fit within the square cardboard piece.
You can draw a star shape by hand if your drawing is good or there are hundreds of star templates available for free on the internet. Just download it, print it, and trace it on cardboard.
You will need two-star shape cardboards to double the lower layer of the star to try to make it more sturdy.


Step Two
Cut two cardboard star shapes.

Now apply hot glue and stick both of the stars with each other.


Step Three
Now cut 4-5 cardboard strips about 1.5 inches wide and begin to apply these strips around the star.

Start gluing the strip along the edge of the first star as shown below.


You might like to read:
DIY snow flower with parchment paper
DIY Paper bicycle step by step with pictures
How to make paper flower bouquet step by step tutorial
DIY paper palm leaves step by step
How to make Juju hat for wall decor
Swedish paper star with step by step


Step Four
Now it’s time to paint, you can use any paint of your choice but I’m using dark brown paint to give it a dark wood touch. Paint the inside of the tray first and then the edges, at the end paint the bottom of the tray. Let it dry for 30-40 minutes.


Step Five
You can see holes in the cardboard edges. You can either paint them or use paper and glue to cover them. Another alternative is to add acrylic rhinestones or mini buttons.

We need to cover it so take a large amount of paint on a paint brush and apply a thick layer of paint on the edges as shown below:


By doing this it will give a smooth edge look to the tray.


Now let it dry for 3-4 hours and if possible let it dry overnight. If you see that the paint is absorbed by the holes of cardboard edges then apply another thick coat of paint and let it dry.
Tip
Is best to use matte paint as it will give a more realistic wood look and if necessary add another paint layer to achieve the best look.
Now the cardboard star tray is ready!


